
#
Datasets
Last update: Mar 8, 2024
#
#
Introduction
In the field of AI, it's the collection of data used to train an AI model. It contains examples of the inputs the model is expected to handle, along with the correct outputs.
In the context of RVC, it's an audio file that's given to RVC, containing the voice the model is going to replicate. It can be either a speaking or singing voice.
The quality & length of the dataset are the biggest determining factors of the final quality of the model. Let's explain.
#
#
Length
For beginners we recommend sticking with 10 minutes, or 20 if you want it very high quality.
If you wish to go for more, keep in mind, usually anything further than 40 minutes isn't necessary.
With modern versions of RVC, the dataset can be just a single audio file, no need to split it in multiple files.
#
#
Quality
#
Recommendations for a quality dataset.
#
#
Range.
- Vocals must be clear, hit low/high notes, & pronounce every vowel correctly.
#
Clean vocals.
- Ensure there isn't background noise, reverb, overlapping voices, music, distortion, or small silences. You'll learn more in the Cleaning section below.
#
Audio quality.
- The higher the audio quality, the better. If possible have it in a lossless format like WAV or FLAC, not a lossy one like MP3.
#
No sibilance/popping.
- Additionally, don't include harsh sibilance (loud "S" & "SH" pronunciation) or popping sounds (loud "P" sound).
#
#
Cleaning
- First, clean the undesired noises explained before using a vocal isolation software.
Then, to remove silences, distortion & minimize (even more) noise, we'll use tools from Audacity. A free, simple & very light-weighted DAW.
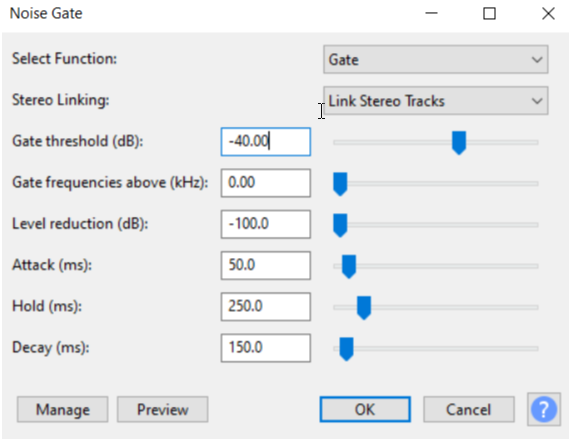
# Step 1: Noise Gate.First input your dataset by dragging the audio file into the app.
Press CTRL + A to select the whole audio.
Navigate to the
Effectmenu at the top, go toNoise removal and Repairand selectNoise Gate.Use these values & apply the changes:
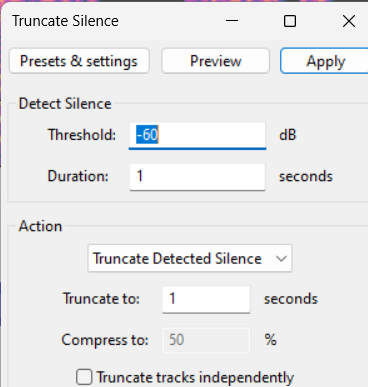
# # Step 2: Truncating Silence.- Go to Effects -> Special -> Truncate Silence
- Use the following values:
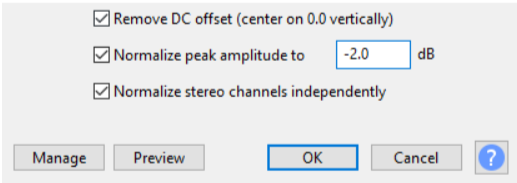
# Step 3: Audio Normalization.- Go go to Effects -> Volume and Compression -> Normalization
- Use these values:
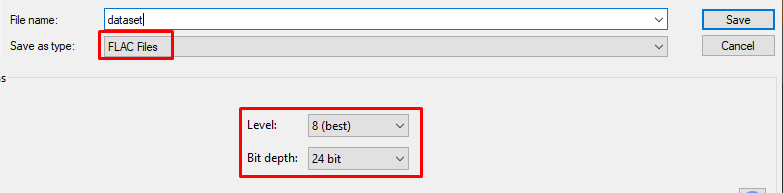
# Step 4: Export.On the upper right corner go to File and click
Export Audio.
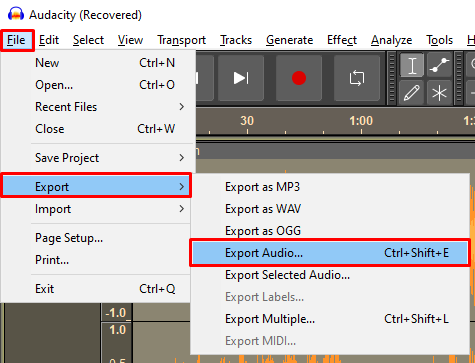
And finally, introduce these values:
- Format:
FLAC - Bit depth:
24 bit - Level:
8
# 
- Format:
#
#
Recording Tips
#
Advice for recording a dataset.
#
- Record while reading anything, like a book.
- Warm up your voice. Clear your throat & read out loud before starting.
- Make it natural, not robotic.
- Pronounce every vowel correctly.
- Hit low & high notes. Don't have to exaggerate it if you don't need to.
- Get close to the mic, not too much to avoid sibilance/popping
- Avoid background noise. Close windows, door, turn off the computer, unplug fridge, etc.
- Don't be in a room with reverb. It's best if it's in a small-to-medium sized room with lots of stuff in it, specially soft like beds, couches, pillows, etc.
- Have a good posture, it's good for breath support.
- Have a drink at your side to not dehydrate.
#
#
Sample Rate
This is a unit in that defines the total amount of samples (data) that can fit within 1 second of an audio. They are measured in kilohertz (kHz).
The most common sample rates are 32, 40, 44.1, & 48. The higher the sample rate, the more information it stores, therefore the higher the quality.
While training in RVC, you'll have to set the target sample rate as your dataset's. This value affects the final quality.
# A simple way to determine it is with the Ilaria Audio Analyzer tool:# STEP 1:
# STEP 2:Press the upload box & select your audio. Or just drag & drop. Then use it's done uploading, click
Create Spectrogram and Get Info.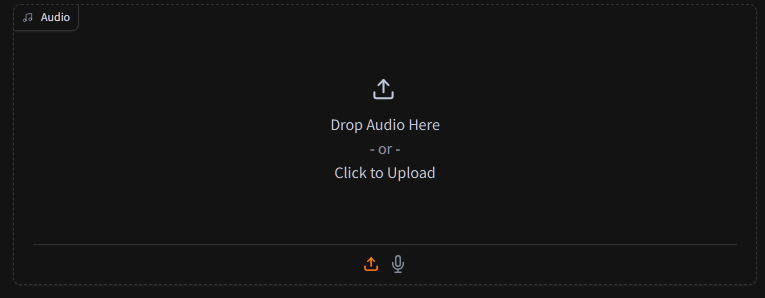
# STEP 3:In
Samples per secondyou'll see the audio's full sample rate. Insert that value in RVC.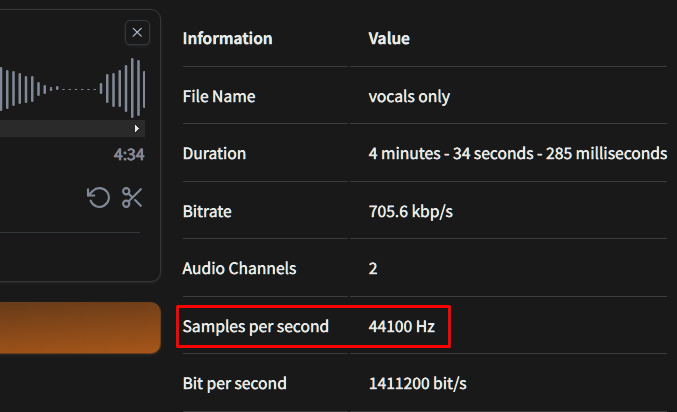
WARNING:
If the frequencies don't reach the top of the spectrogram, see at which number peaks & multiply it by 2.
# # Example: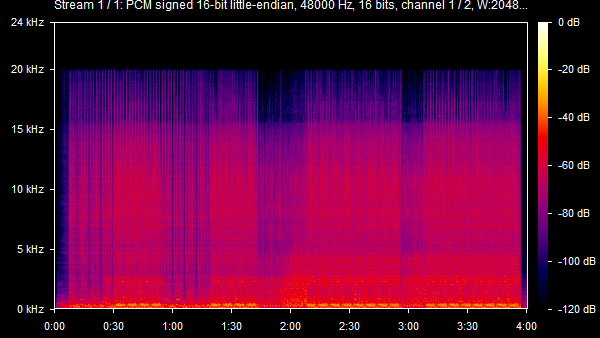
Here it reached 20 kHz. Doubling it gives 40kHz. Therefore the ideal target sample rate would be
40k